
This lesson will help you to learn how to search through the tables for the data you need and how to perform information retrieval in the online database using specific conditions.
Filters
The main problem we face when processing large amounts of data is that we have to previously collect the data from the database that meets specific conditions. Sales manager, for example, deals with prospective customers, while customer manager deals solely with regular customers of the company. How to grant managers the access to see their clients only? This issue can be easily solved through filtering the data in the tables using specific filter conditions. Ability to create pre-defined filters is one of the main advantages of our program.
Filter works as a customized selector of the information which is contained in some table. Filters apply when current fetch is used rather often.
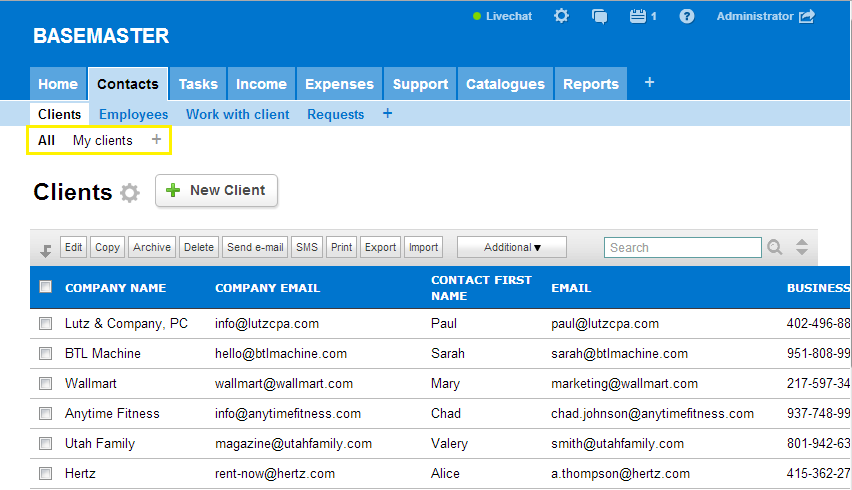
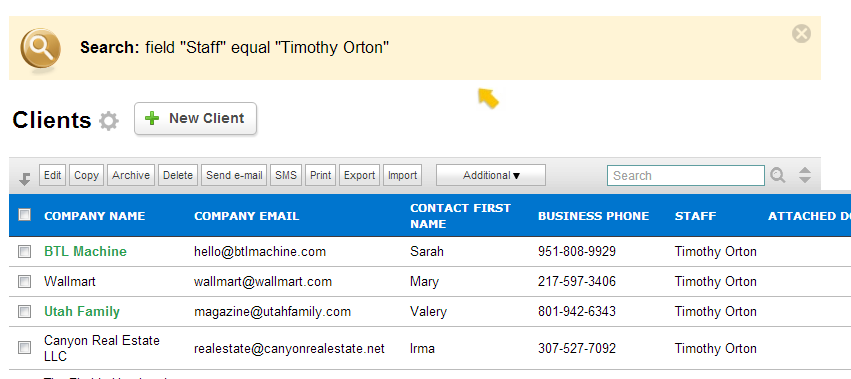
The "Clients" table in the standard configuration (the same is in a demo account) features following filters: All and My clients. These filters are based on checking the values of the "Staff" field in the "Clients" table. If you choose "All" filter you will see all the table entries. If you choose "My clients" filter, you will see only those companies, which "Staff" field has your name in "Staff" value.
Filter can use one or more criteria. Now let's talk about how to create filters.
Creat and edit filters
Let's try to choose only revenue-intensive customers in our "Clients" database. In order to do that we have to create a new filter for "Clients" table. Please note: to see if the filter works right there must be several companies with different statuses in the "Clients" table.
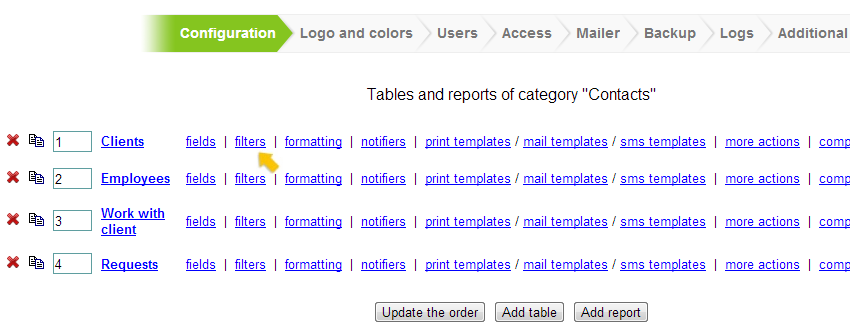
1. Go to Settings (the gear icon in the top left corner of the window) => Configuration
2. Choose the "Contacts" category and click on a "filters" link next to "Clients".
3. You will see a list of existing filters. Click "Add filter" button.
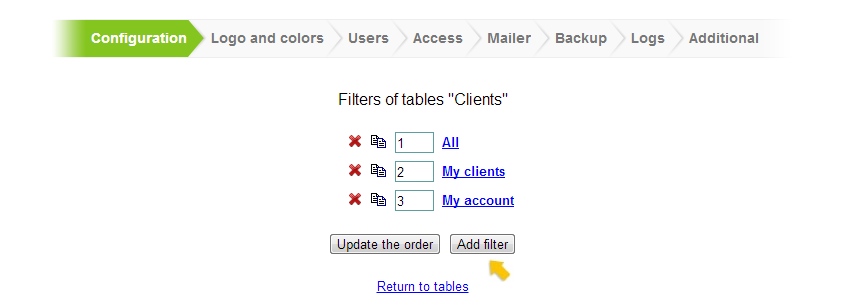
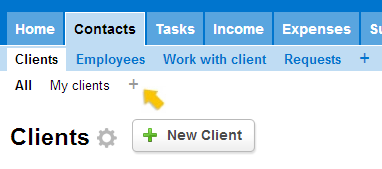
NOTE! There is a quick way to create a new filter. Just click on the "+" sign located to the right from the list of table filters.
4. In the window that appeared enter the name of the filter. It is essential that any user could define the criterion for filtering by looking at the filter name. In this case the most appropriate name is "Revenue-intensive".
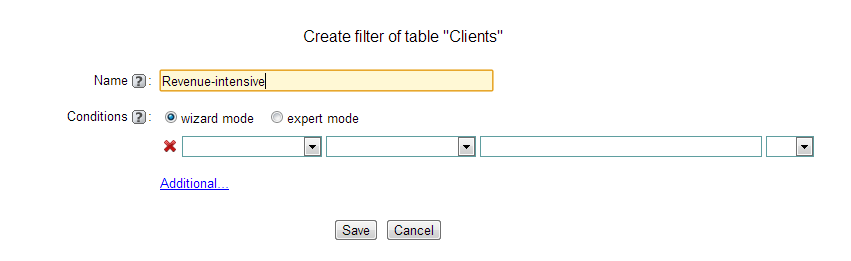
5. Now let's get down to the most important thing - establishing of conditions which filter will use. There are two ways to establish a condition: through wizard mode or expert mode. Operation through expert mode requires some SQL knowledge on your part. Wizard mode allows you to create a filter even if you have no expertise. You just need to determine how to describe the condition. If we want to get a list of important customers, that means we need all the table entries with "Revenue-intensive" value in their "Status" fields. Well, let's get started. First, we have to choose a field from the list which filter will use for its operation. In this case, it is "Status" field. Then we choose the trigger condition for our filter. In this case it is "equal". Now let's choose the trigger value. In this case it is "Revenue-intensive". So now we have a condition: "Status" field is equal "Revenue-intensive".

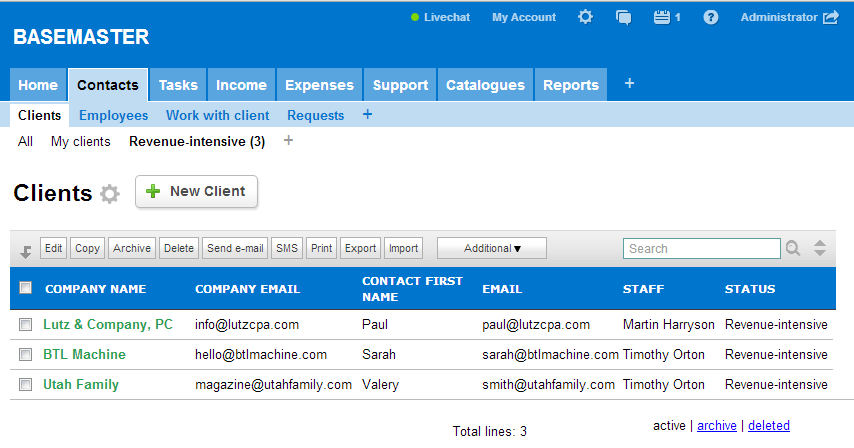
6. Done. Click on "Save" button in the bottom of the window. Now let's see how the new filter works. Go to "Clients" table. You will see an "Revenue-intensive" filter on the filter list. Click on it. In the table you can now see only those clients which "Status" fields contain "Revenue-intensive" value (they are shown green on the picture below because color formatting for "Revenue-intensive" status is set). If you don't see any entries that means there is no important customers in the online database.
Now let's make our filter condition a little bit more complex. This time we choose not just revenue-intensive customers but new important customers that were added to the online database during the last month.
NOTE! Each entry in any table has an "Time when added" field. This field cannot be seen in the table when the default settings are set. However, it always contains add date and time of the current entry. This field can come in handy if you need to find the data which was added during the certain period.
Here is how our condition looks like: "Status" field should be equal to the "Revenue-intensive" field and "Time when added" must be above or equal to 30 days before the current date, but less than or equal to the current date. Go back to "Revenue-intensive" filter settings. Add one more line to the condition (auxiliary condition can be established when creating the filter by clicking on "Add" button located to the right of the condition). First, we have to define how these two conditions will be connected. If you choose "AND" the filter will work in case both conditions are met at one time. If you choose "OR", the fiter will work in case any condition is met. In this case we choose "AND". Then we choose "Time when added" field – "greater than or equal" – "{current date}" – "-" – "30" – "days". Proceed to the next line. Choose "AND" again and then click on the "Time when added" field – "less than or equal" – "{current date}".
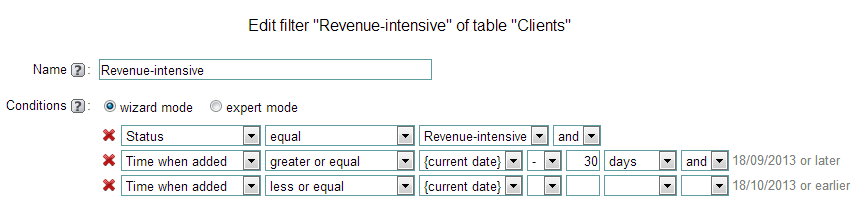
Please note that there are tentative tips for current date and time shown to the right of the condition. They help you to establish conditions using date and time. Using them makes it easier to determine if the time horizon is correct. Now condition is defined. Save the changes and go back to the "Contacts" table.
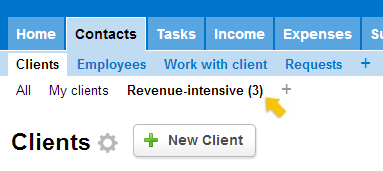
Now, every time you press "Revenue-intensive" filter, you get a chance to see the important customers only which had been added during the last month. In case you don't see any entries that means there were no revenue-intensive customers added during the last month.
When in filter settings you can determine whether number of entries that meet the filter condition will be shown near the filter name within the brackets or it will not. This is very convenient because you don't have turn on the filter to see if it contains entries in it or not.
Hide fields capability
When creating a filter there is also an ability to define the fields that will be hidden through this filter. Sometimes you need to find similar products with some different properties in one reference table. It is irrational to create two separate tables to fill them with information about sausages and bread, for example, since they have a lot of equal fields like receipt date, cost, selling price, acquisition date, etc. But each of the products can have some fields which are specific for that kind of product. It may be: flour type (for bread), meat type (for sausages), etc. In that case there is no doubt it will be reasonable to see the bread related fields because sausages characteristics will be incidentally useless and may confuse the user.

In this case you will need two filters: starchy foods and meat products. "Starchy foods" filter will be used for hiding sausage related fields, while "meat products" filter will be used for hiding bread related fields. Another asset of the program is Default Value function. If you have chosen meat products filter and trying to add a new line, it's pretty much obvious that you want to add a new type of sausages and the type of the product can be considered as meat. In this case, you have to set the default value for "meat products" filter. Do the same to "starchy foods" filter.
Search function
Another way to find in the online database the data you need is to use Search function. Our program features three types of Search: simple, advanced and constant search. Using two types of Search at one time will make your online database operation as much effective as possible.
Simple Search
First, let's see how Simple Search works. Above the table, on the right side you can see a box for text and a magnifying icon.
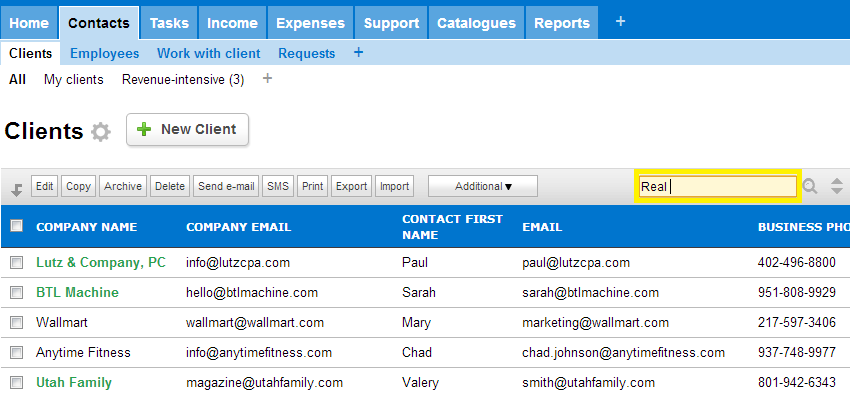
You can enter search term or just a sequence of symbols in the search box. Simple search works the same way as any online search. Click the magnifying icon and you will see the entries that contain the current character sequence (irrespective of what field this sequence is located in). You will also see a message describing the search query above the table heading.
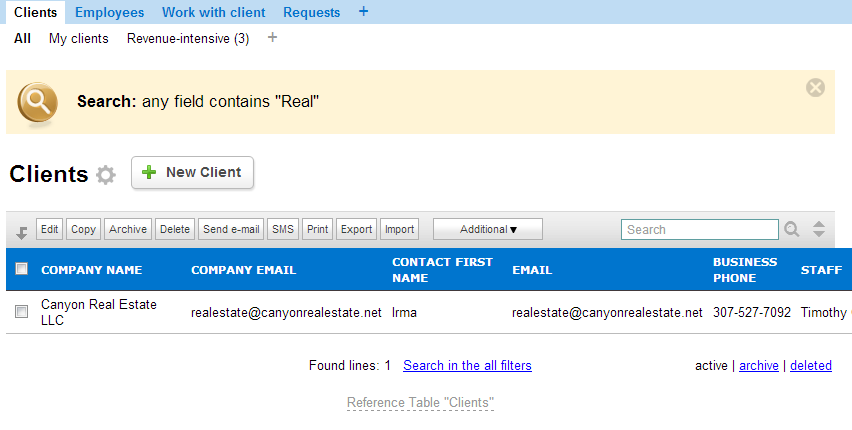
To go back to entries close the window by pressing the cross icon on the right.
You can perform a search using all filters. In order to do that, you have to press "Search in the all filters" button located below the table after you set the search value and pressed the magnifying icon (or "Enter" on the keyboard). You can see a number of entries found below the table.
Advanced Search
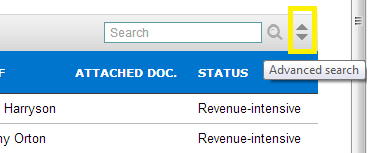
Use Advanced Search to define the search conditions more precisely. Click on two small triangles that located on the right side of the search panel.
You will see a search conditions line. You've already seen it when you were creating a filter. In reality, it is the same sort of thing. The only difference is that the filter is set just once and used often. So if you noticed that you have to establish the same advanced search condition over and over again, creating a filter with this condition and applying it when needed with a single click will make your database operation much easier.
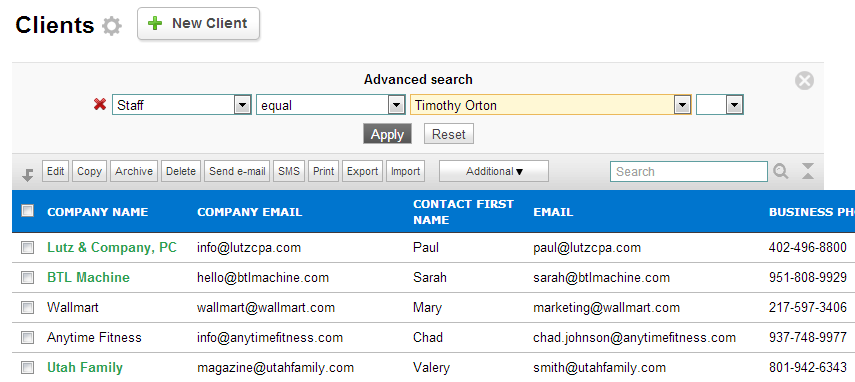
Now, if you click on the pink search condition field, you will see an advanced search panel with condition designer. You can use it to correct or update the existing condition.
Fixed Search
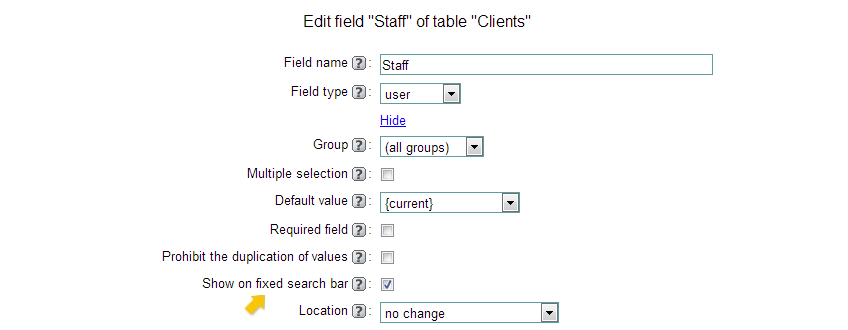
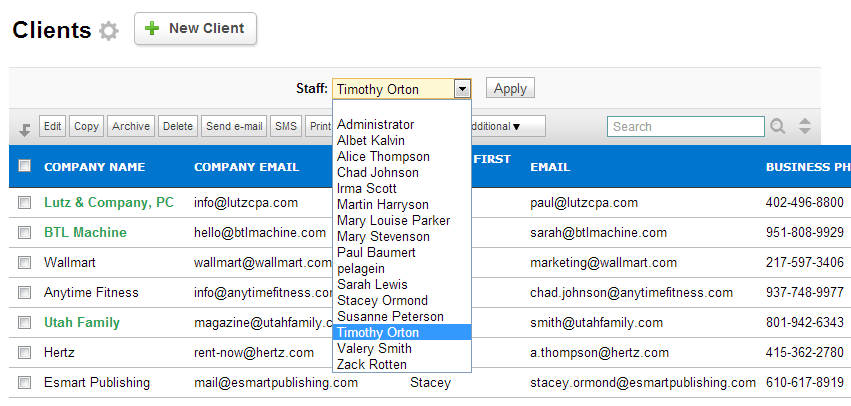
Whith Fixed Search function there is now an ability to establish the fields, which titles will be seen on the Fixed Search panel located in the head of table. To do it you have to open the settings of the field that you need and click check box "Show on fixed search bar":
By changing the fields' values, you can quickly filter the table entries using these values.
Now you know how to search through tables for the information you need, how to create filters, as well as configure and perform advanced search.
Task. Create a filter for another table. It can be "Invoice" table from the "Income" category. Create a "Large sums" filter to show the invoises with value of "Invoice total" field greater than or equal to 1000.