
This lesson will help you to learn how to create documents that will contain the data from our database all by yourself. These documents will be editable and printable.
Print Templates
In our program you may create any kinds of print templates. For example, you can draw bills, create work completion certificates and fill in model contracts, all using the data from the tables. Print template is used to determine how the document will look like and where should the values of table cells be added. Basemaster print templates allow you not just to print documents but also to save them as rtf, odt (OpenOffice), docx (Word 2007), xls or pdf files. This lesson will help you to learn how to create xls templates (we strongly recommend you to use OpenOffice and Excel 2007 software when creating xls templates for our program).
Creating Print Templates Using Excel Document
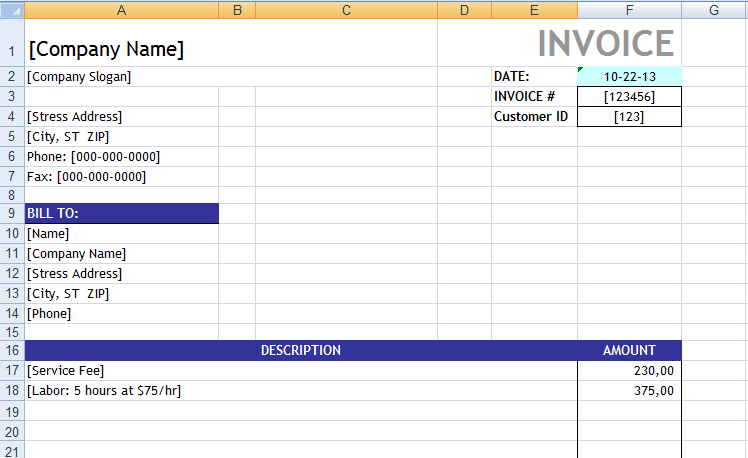
1. First, you have to draft a document using Excel. Put the text, borders, lines, etc. you need in it. Leave areas that will be used for storing the values from Basemaster tables empty. Save the document but do not close it - you will have to edit it during the following steps. You may also download a template of any Excel document from the web. Let's take a simple invoice that calculates total, for example.
2. Now open the Basemaster program, proceed to Settings (the gear icon in the top left corner of the window) => Configuration
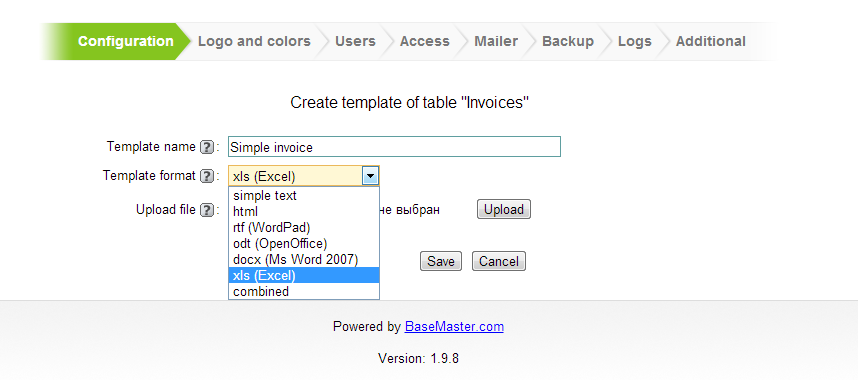
3. Choose the "Income" category and click on a "print templates" link next to "Invoices".
4. You will see a list of existing templates. Click "Add new template" button.
5. When a new window appears. First specify the name of your template. Then you have to choose the template format. Choose "xls".
6. Choose the file you are going to work with. Click "Upload" button.
7. So, the file is loaded. You can now see a list of the fields that can be used in your template.
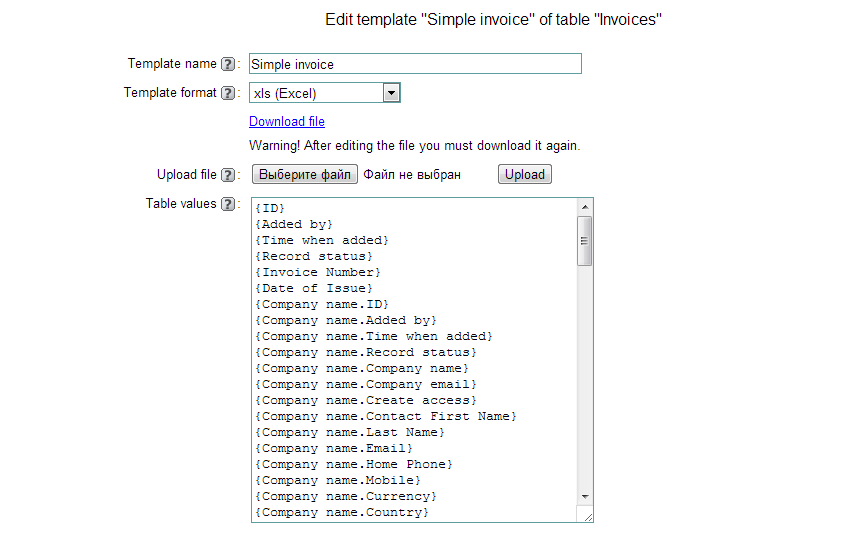
Now you have to put the field templates into the areas of your Excel file, which will be used for storing the values from your database. For these purposes, you have a list of the fields that can be used in a template located in the "Create template ..." window. Copy the full field names from the list, including curved brackets. Then you have to put it correctly into the Excel file. Do not misplace it.
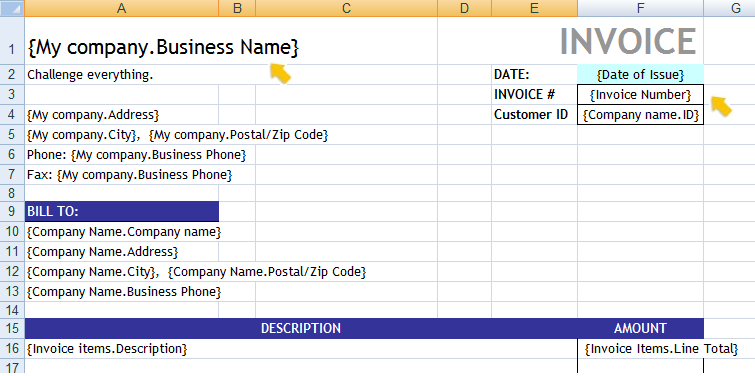
Please note: besides the fields from the current table, like {Invoice Number} field, for example, you may also use fields from the linked tables. They all contain a point in them, like that one: {Invoice items.Invoice Number}.
Format the cells, so that they look correct in Excel. For example, text format works perfect for Vat Registration Number and Company number cells, since Excel may consider Vat Registration Number code as an overlarge number which will result in it being displayed incorrectly.
8. After putting all the fields you need into the xls file, save it. The template is ready. Now you have to load the template you created one more time. Click "Select" button again, choose our xls file and click "Download" button.
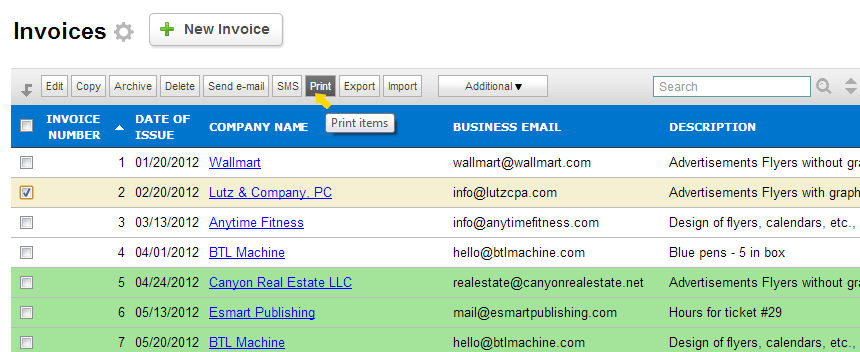
9. Open the table "Invoices" and choose the entry. While in view mode, click "Additional" button and then "Print" button.
Then choose your print template.

Specify the name of the file that will contain the document. That's it, the document is ready. You may open it and make sure that all the field values from the database are there.
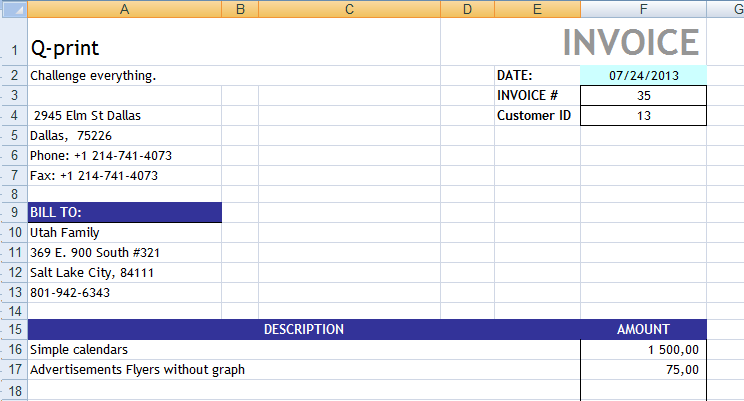
Our variable list also comes in handy when working with data from subtables. In case you copy and paste fields from a subtables that contain several lines (in our example - field {Invoice items.Description}), all values will be pasted automatically. They will be added top to bottom, one after another. By this means, you can create a group of them with items.
Functions That Can Be Used in xls Templates
When adding field templates, conditions and functions to the cells of the xls file, you have to put them into curved brackets, like here: {My company.Address}. You may use parentheses inside the curved brackets, like here: {(Sum*(1+My company.VAT/100))}
DateInWords(Date) - used to display the date in words. For example: in case "Date" field contains this value: "11.21.12", the DateInWords(Date) function will return the value of "21 November 2012".
MonthInWords(Date) - used to display the month in words. For example: in case "Date" field contains this value: "11.21.12", the MonthInWords(Date) function will return the value of "November".
DateDay(Date) - returns an integer value that corresponds to the day of the month. For example: in case "Date" field contains this value: "11.21.12", the DateDay(Date) function will return the value of "21".
DateMonth(Date) - returns an integer value that corresponds to the month. For example: in case "Date" field contains this value: "11.21.12", the DateMonth(Date) function will return the value of "11".
DateYear(Date) - returns an integer value that corresponds to the year. For example: in case "Date" field contains this value: "11.21.12", the DateYear(Date) function will return the value of "2012".
DigitFormat(field template) - returns a rounded-off decimal number that includes two digits after the decimal point. For example: DigitFormat(3.068) will return the value of 3.07.
DigitFormat(field template,n) - returns a rounded-off decimal number that includes n digits after the decimal point. For example: DigitFormat(3.068,1) will return the value of 3.1.
MoneyInWords(field template) - returns a rounded-off decimal number that includes two digits after the decimal point and the currency format is applied. For example: the MoneyInWords(3.068) will return the value of "three dollars 07 cents".
Name_of_subtable.IndexNumber - returns an integer value that corresponds to the index number of the record in the subtable. For example: say you want all records of "Invoice Items" table to be shown in the document. To do this you have to put {Invoice Items.IndexNumber} in the cell where should be displayed the index number of the record.
LinesCount('Name_of_subtable') - returns an integer value that corresponds to the total number of records in the subtable. For example: say you want that all records and the total number of records to be shown in the report. To do this you have to put {LinesCount('Invoice Items')} in the cell where should be displayed the total number of records.
Besides you may use built-in Excel functions and apply formatting the cells.